
projects
Culver Garden Court Fire Scare
This past Sunday there was a scare for Culver Garden Court. Apparently a grass fire in the adjacent field to the south got out of control and crossed onto the Garden Court property. You can see in the pictures below where it wrapped around the building on the southeast and southwest corners. It burned some of the existing landscaping, the vegetation in the detention pond and melted the silt fence we had along the property line. If obviously could have been much worse!

Other than the respiratory concerns from the smoke, the residents were not in danger. Culver Garden Court is the first Garden Court project to fall under the new fire protection regulations which mandate a sprinkler system. I’m still glad that we didn’t have to test that though!
The landscaping is the last item we have to complete and despite the balmy March weather we’ve been having, we’re a little hesitant to plant grass yet. It will be coming soon though. If you’d like to see the future landscape plan, you can see it here.
Culver Garden Court – Permission to Occupy!
 This past Tuesday we had our PTO (Permission To Occupy) meeting with HUD for the Culver Garden Court. This released the building to the property management company (Bradley Residential Management, formerly Real Estate Management) and they started to move furniture in that day. There were a few minor cleaning issues and some general touch-up items to be completed and they are underway. We will be moving the equipment and trailers off the site this week. The first residents will be moving in on Monday of next week! We’ve had to kick one future resident out multiple times over the past month as he’s been impatient to move in! Ha!
Due to the timing for completion of this building, there were a few items escrowed including the landscaping. This is scheduled for installation later this Spring. If our Spring comes in as mild as the Winter has been, we should be able to get an early start on it. Since it includes seeding, we don’t want to push this too early though.
We think this has been a successful project and we have gone over and above since it’s in our home town. There will be an announcement for an Open House and Ribbon Cutting coming out soon which we’ll include as a post here. We look forward to seeing you there!
We’ve included a few additional pictures after the jump.
Culver Garden Court Emergency Services Walk-thru
Tonight we’re going to have a walk-thru at Culver Garden Court for Culver’s Emergency Services personnel. We’ve invited any of the Culver Fire Department, Culver EMTs and Culver Police that would like a tour of the building. As this is housing for the elderly, we feel it is important to familiarize them with the facility. This is something we have done in the past with other Garden Court facilities we have built.
 Culver Garden Court has the first Knox Box in Culver. (Wikipedia description here.) A Knox Box is a small safe that is installed at the front door of a building. It will contain a master key to the facility. In case of a 911 call, whether a fire, medical emergency or other, the emergency service personnel arriving at the site will be able to access the key using a key to the Knox Box.
 Now that the program has been initiated in Culver, I would anticipate that other Culver facilities will want to install them as well. While the boxes are somewhat expensive, they are generally less expensive than the cost of the door replacement due to the the fire department taking an axe to the door. It is also a life safety issue. Opening the door with a key is the most efficient way to get to a life in jeopardy on the other side. In my opinion the Culver Schools, the Culver Library and the Culver Town Hall should all have Knox Boxes. In the spirit of the one installed at Culver Garden Court, the Culver Cove, Beachside Condos and Beach View Condos should consider them as well. Knox Boxes can also be installed on private homes.
 I believe the next step for Culver should be to develop a policy regarding Knox Boxes. There’s a lot of responsibility involved in their use. All the Knox Boxes in a community have a master key. A chain of custody for these keys should be established. A policy should be adopted on how to handle them. (Some communities have controlled access safes in each emergency vehicle to establish accountability and a chain of custody for anyone that accesses the key.) Depending on the type of policy developed, Culver may want to apply for a grant from the Marshall County Community Foundation (MCCF) to implement a program. (Thanks for the suggestion B3!)
I would also like to see a standard set for the location of the boxes. The Knox Box company has a recommendation, but it should be established. It does no good for the box and key to be there if emergency services have to search for it. A second step forward here would be a program that initiates emergency plans for the buildings with Knox Boxes. An emergency services walk-thru for each of these buildings, similar to what we have planned tonight, would help them if they ever had to enter that building in an actual emergency.
I plan to follow up tonight’s meeting with a discussion at the Town Council to get them thinking about implementing this policy. I believe doing this by ordinance would be appropriate, but that would be up to the council to make that determination.
Culver Garden Court Siding Progress
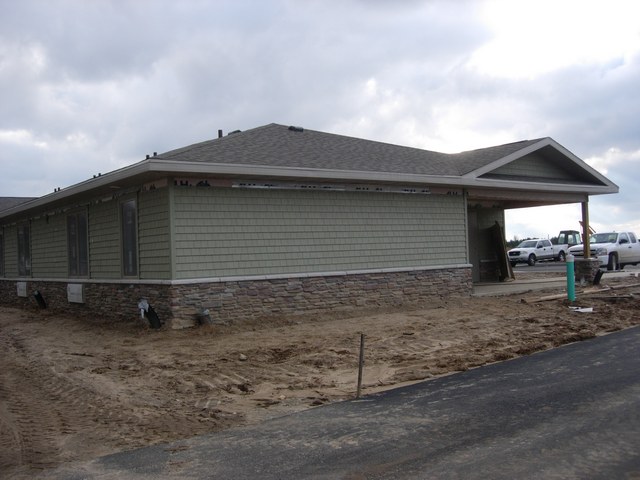 We previously discussed efforts to make Culver Garden Court “Greener” than previous Garden Court projects. Apparently our project architect, Brent Martin, took that a bit literally when selecting the color scheme as you can see as the siding installation progresses. The siding is Certainteed’s Cedar Impressions and the color is Cypress.
There is a flurry of activity at the site now that the drywall and painting has been completed. The vinyl tile has been installed. The cabinets are in place. This is allowing installation of door frames, plumbing fixtures, electrical devices and electrical fixtures. On the exterior the siding is nearly complete as well as the soffit. The gutters and downspouts are scheduled for completion this week as well.