Telkonet Thermostat Image borrowed from www.eregrinegroup.com
Check out the Telkonet thermostat. I’ve previously written about the Nest thermostat and the Honeywell Wi-Fi thermostat. Telkonet claims to take it another step further. Not only is their thermostat programmable, accessible from the Internet and “smart”, but it can calculate roof comfort by aggregating data like time-of-day, solar load, brightness, humidity and occupancy patterns. It’s Ecoinsight feature determines when a space is occupied or vacant and reverts to preset temperature limits. Check it out at their site here.
The Ecoinsight thermostat is more for commercial applications than the other two. While it has Internet connectivity, it may require special networking in order to access it. This is more efficient where you have multiple installations.
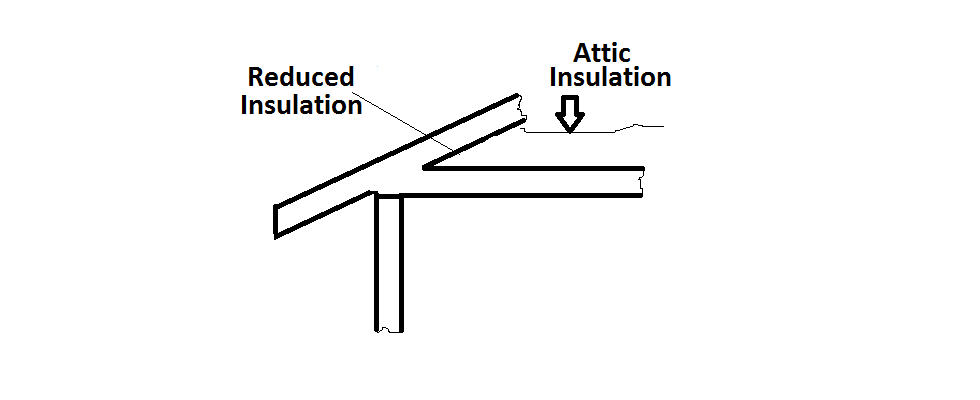
I’m not talking about stripper shoes! I’m talking about truss construction. This is something we’re seeing and recommending more in new construction. Installing a truss with a raised heel detail allows for more insulation at the perimeter where often the insulation is compressed or absent due to the proximity of the interior ceiling to the roof deck. The detail to the right shows how a standard truss is built. As discussed here before, venting and insulation is important to shingle life and to prevent ice damming.
A high heeled or raised heel truss (see left) is created with the equivalent of an additional wall section separating the bottom chord and top chord of the truss at the exterior wall. This allows full thickness insulation to extend out to the wall and complete the protection of the building envelope. If care is used in selecting your roof slope and eave extensions, this is never noticed as your soffit can be installed to return at the same height as the interior ceiling making the construction look like a standard cantilever truss.
When you’re planning your new home or addition to your existing home, make sure and ask us about this and other “Green That Save Green” solutions.
Last Thursday I went to a presentation put on by Honeywell and Mid-City Supply in Plymouth that discussed their latest advancements in programmable thermostats. I would hesitate to say that this is their answer to the Nest thermostat I talked about previously (here), since Honeywell was actually doing this first, but I think Nest and its advances and popularity are pushing them to be more innovative. They have reduced the size of their programmable stat, given it more color options and beefed up their internet connectivity.
The three main things that I think set the Honeywell system apart are as follows:
They have a lot of module add-ons available. (Homeowner Accessory Flyer) They can tie together multiple thermostats, zone sensors, duct sensors, humidity sensors and outdoor sensors within the HVAC realm. In addition they are adding things like sump pump sensors which will make your thermostat more of a multi-function device.
Their RedLINK system has its own wireless bandwidth that works in a 1/2 mile radius to tie the modules together. The advantage of this is the entire system becomes just one device on your wireless internet router reducing the load when Dad is playing video poker, Mom is watching a Netflix movie and Junior is playing a multi-player online game.
There is a commercial option for this system, partially allowed by the flexibility listed above.
I generally feel that upgrading electrical fixtures and devices to the newer energy-saving devices is the easiest green energy to justify. Great strides are being made in this area to the point that my average client can see savings with a short pay off time. This is often something that shows gains with a one-to-one swap of new for existing fixtures. Further gains can be achieved by designing around the new fixtures and adding energy-saving controls.
One of my supplier reps was in yesterday and shared the following analysis that he completed for one of his manufacturing clients who was considering upgrading their existing exterior wall pack lights from HID (High Intensity Discharge such as High Pressure Sodium or Metal Halide) to LED (Light Emitting Diode):
These are the wall pack security fixtures you see high on the wall around factories, warehouses or buildings with parking near their wall.
At $0.08 energy rate, 10 hour/day, 365 days/year the energy savings is $102.79/year.
LED = In a ten year time frame you would spend $450 for the LED fixture and $305.80 for energy use.
HID = In a ten year time frame you would spend $218 for the HID fixture plus change the lamp four times and the ballast once. 2 hours labor times 4 times is 8 hours. The cost for the four lamps and the one ballast is $124.
We are finishing up a kitchen renovation for a residence on Lake Maxinkuckee. The old kitchen was top of the line when the home was built, but it was looking dated and did not function the way a modern kitchen would. It lacked a working “kitchen triangle”, and it had a wall and galley door closing it off from the dining room. While there was a window over the sink looking west, the dining room had two walls of windows looking west and north.
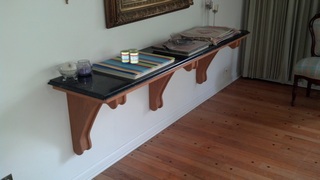
Existing Buffet Shelf
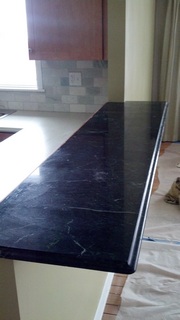
We obtained options from two kitchen cabinet providers for new cabinets and countertops each suggesting different concepts. The one we chose included removing the door and cutting the wall between the kitchen and dining room to provide a bar top counter. This opened up the kitchen to a tremendous effect. There was an existing marble buffet shelf/sideboard in the dining room on the adjoining wall that we were able to re-purpose as a breakfast bar top. This provided some continuity for the owners and salvaged a unique piece that would have cost hundreds of dollars to duplicate. (Green that saves Green.) We were also fortunate that the wall between the kitchen and dining room was not load bearing, so we were able to remove it with little difficulty.
Former Buffet Shelf re-purposed as a breakfast bar top
The original kitchen included a wrap around counter that served as a breakfast table, but its location was between the refrigerator and the sink and stove breaking up the workspace. When someone sat at the table, their chair conflicted with the galley door. This made for an intimate kitchen setting for a couple to have breakfast, but made for a difficult situation when the house was full on a summer weekend.
Aside from pulling the refrigerator back into the workspace, little was done to change the cabinet layout. Existing metal cabinets were replaced with wood cabinets with a finish that complimented the wood floors in the dining room, again pulling the two rooms together. Plastic laminate tops were used as an economical solution, but decorative edges were included to enhance the design.
The original kitchen had white cabinets on white walls. This helped brighten the space and gave it a clean look. The new kitchen is more of an extension of the dining room, so green tones were used in the countertops, walls and tile along with extending the wall color out into the dining room as an accent wall. These colors were chosen to play off the salvaged buffet shelf. These colors along with the wood tones of the cabinets helps to pull the two rooms together. Mike Fox of Talk to Tucker in Indianapolis has been helping us with color schemes and has done a great job of pulling things together.


 Last Thursday I went to a presentation put on by